Pre-sprouting French fries potatoes

Early crops and bringing forward late varieties
Verschil in opkomst door voorkiemen
Pre-sprouting can achieve a growth advantage of 10-14 days

Benefits of pre-germinating French fries varieties

  • Rapid initial development gives a longer growing season and a higher yield in kgs.
  • Break off the top shoot (e.g. via the chute, crate turner) to produce more sprouts and more tubers.
  • If the extra sprouts are hardened off properly, the harvest can be brought forward.
  • A higher number of tubers means more mutual competition. This results in less foliage, hollow heart and mechanical damage.
  • Pre-sprouting leads to a more natural die-back. As a result, the potatoes will have an underwater weight that is an average of 10-15 points higher.
  • Haulm destruction is also easier. Appropriate N fertiliser should be applied.


Advisory calendar
fries potatoes

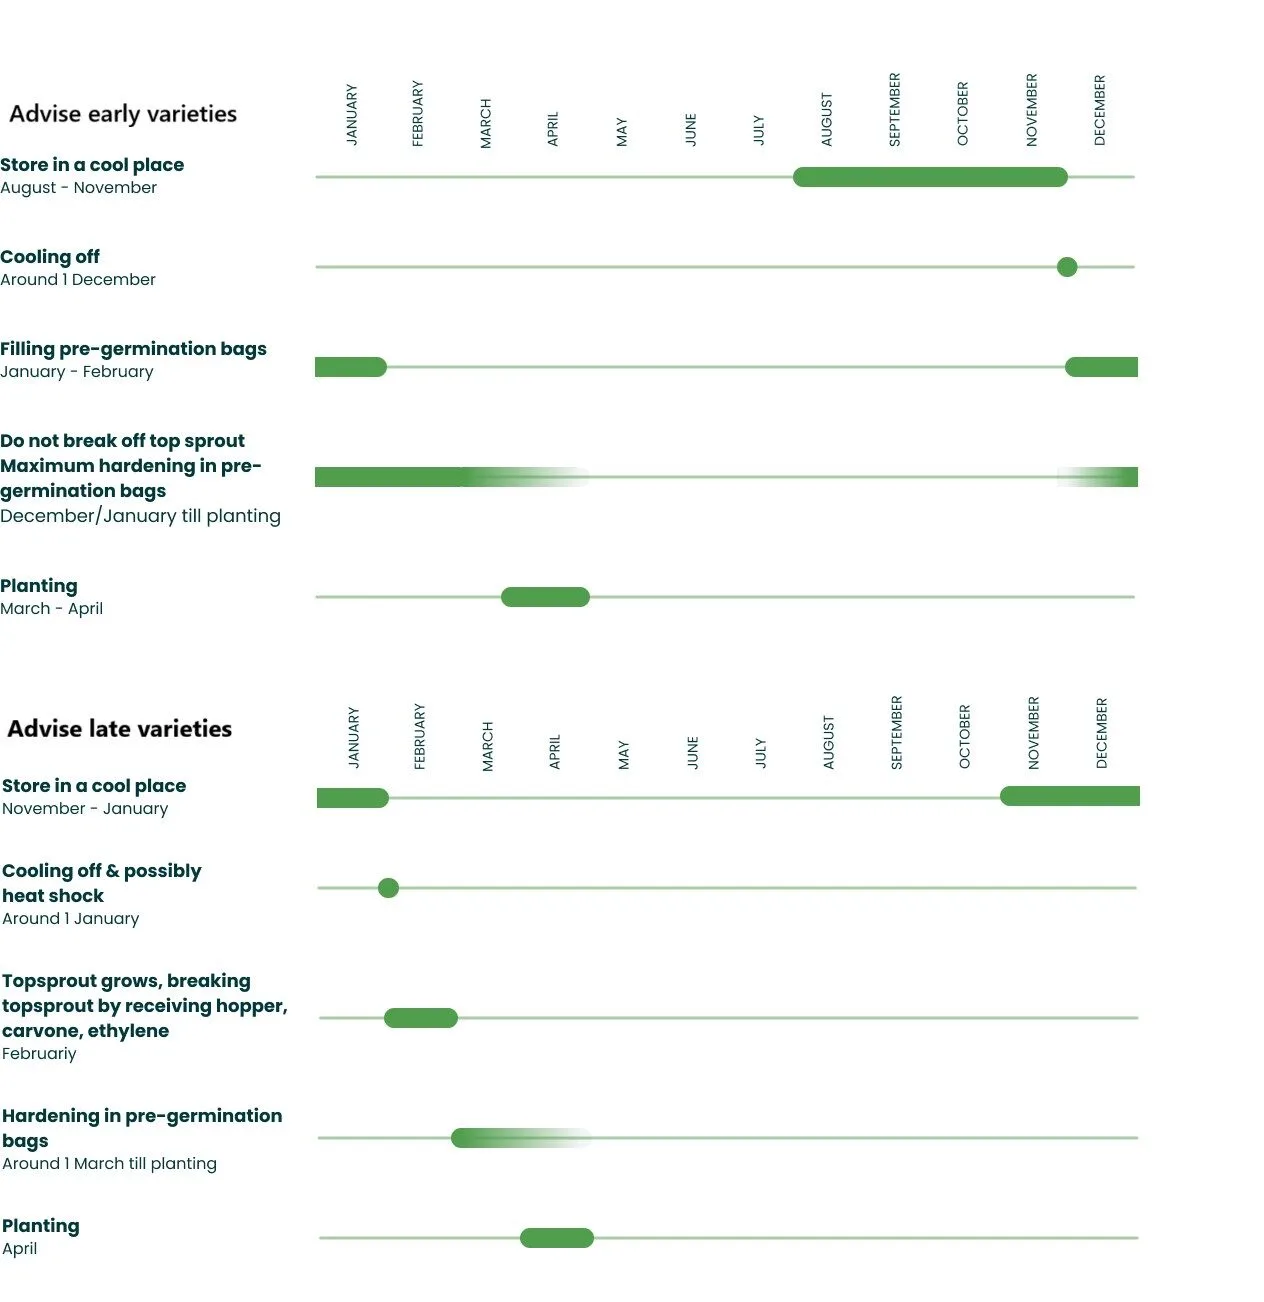
* ALL RECOMMENDATIONS ARE FOR AVERAGE CONDITIONS IN THE NETHERLANDS.
BECAUSE WE HAVE NO INFLUENCE ON SEED QUALITY, WEATHER, BUILDINGS, MACHINERY AND OPERATOR EXPERTISE WE CANNOT ACCEPT ANY LIABILITY FOR RESULTS.

Hardening in draw barn

An insulated shed with plenty of natural draught is the best option. Ensure there are doors or shutters in the shed that can be opened. The wind and sunlight ensure good hardening off results. Close the doors and shutters if there is a risk of frost.

Advice on pre-sprouting early French fries varieties*

  • Cooling
    Air cooling is usually sufficient. However, additional mechanical cooling can sensible from September onwards.
  • Top sprout
    The top sprout must not break off! With early potatoes, it is important to supply large enough potatoes with sufficient underwater weight using relatively few tubers (6-10).
  • Warming
    If the seed potatoes are very cold and/or it is late in the season, it is a good idea to warm the seed potatoes. In practice, this is usually done at a temperature of 18°-20°C for 3-5 days. Continue heating until the white sprouting tips appear. Then stop heating immediately. Ensure there is enough oxygen in the room.
  • Cutting
    Cutting long seed potatoes and pre-sprouting is possible.
    Read cutting and pre-sprouting for more information.
  • Hardening off
    Indoors: an insulated shed with plenty of natural draught is the best option. Ensure there are doors or shutters in the shed that can be opened.
    Outdoors: this gives the best hardening off results.
    – Place the pre-sprouting racks in the windiest position in your yard.
    – Place the racks 1 m apart.
    – Place the racks in a north-south direction if possible.
    – Move the pre-sprouting racks indoors if there is a risk of frost. No sprout inhibitors have been used here.
    – Ensure maximum ventilation. Use indoor ventilation if necessary. Move the pre-sprouting racks outdoors as soon as possible.
  • Transfer to another bag
    If the pre-sprouting racks are outdoors or in a storage shed, this is not necessary. With a late spring, the leaves on the trees around your farm can inhibit the wind from the end of April. Place the pre-sprouting racks in another windy place if possible and let the power of the wind work for you.If the sprouts have become too long, you can transfer them to another bag once. Lift a full rack above an empty rack with a forklift. Loosen the Velcro fastening from a full bag to release the seed potatoes into the empty pre-sprouting bag.
  • Hardening off time
    Early varieties often have genetically weaker sprouts than late varieties. In this case, aim for 8 weeks or longer of hardening off. Fill the pre-sprouting bags in (early) January.
  • Which pre-sprouting bag?
    Standard pre-sprouting bag (10 cm cord) Capacity 100 kg per bag. Rain covers are not required if sheds are used. A rain cover is recommended if hardening off takes place outdoors.

* ALL ADVICE GIVEN APPLIES TO AVERAGE CONDITIONS IN THE NETHERLANDS. AS WE HAVE NO INFLUENCE ON THE QUALITY OF SEED POTATOES, WEATHER, BUILDINGS, MACHINERY AND THE EXPERTISE OF THE USER, WE CANNOT ACCEPT ANY LIABILITY FOR THE RESULTS.


Advice on pre-sprouting lates French fries varieties*

  • Cooling
    Grade early and store in a mechanical cooling shed. Air cooling is usually sufficient for slow sprouting varieties such as Agria. A small top sprout is positive, but it must still be removed to produce more sprouts.
  • Top sprout
    With most varieties, the top sprout must be removed to produce more sprouts and more tubers.
  • Warming
    If the seed potatoes are very cold and/or it is late in the season, it is a good idea to warm the seed potatoes. In practice, this is usually done at a temperature of 18°-20°C for 3-5 days. Continue heating until the white sprouting tips appear. Then stop heating immediately. Ensure there is enough oxygen in the room.
  • De-sprouting
    Break off the top sprout to produce more sprouts and more tubers. Break off the top shoot via the chute or on the transport belt. Fill the pre-sprouting bags the same pass.
  • Cold treatment
    Good practical experience has been gained by placing filled pre-sprouting racks in a dark, cool (2.5°C) place for another 7-10 days after filling.
    This stimulates the number of sprouts and higher yields from your seed potatoes.
  • Hardening off
    Indoors: an insulated shed with plenty of natural draught is the best option. Ensure there are doors or shutters in the shed that can be opened.
    Outdoors: this gives the best hardening off results.
    – Place the pre-sprouting racks in the windiest position in your yard.
    – Place the racks 1 m apart.
    – Place the racks in a north-south direction if possible.
    – Move the pre-sprouting racks indoors if there is a risk of frost. No sprout inhibitors have been used here. Ensure maximum ventilation. Use indoor ventilation if necessary. Move the pre-sprouting racks outdoors as soon as possible.
  • Transfer to another bag
    Transfer to another bag is not necessary if the seed potatoes are placed in the pre-sprouting bags in weeks 8-9. With a late spring, the leaves on the trees around your farm can inhibit the wind from the end of April. Place the pre-sprouting racks in another windy place if possible and let the power of the wind work for you.
  • Hardening off time
    At least 5 weeks. After that, the longer the better, provided that the pre-sprouting bags are fully exposed to the wind and sunlight.
  • Which pre-sprouting bag?
    Standard pre-sprouting bag (10 cm cord) Capacity 100 kg per bag. Rain covers are not required if sheds are used. A rain cover is recommended if hardening off takes place outdoors.
  • Bags per rack
    14 standard bags per Sprinter2 pre-sprouting rack

* ALL ADVICE GIVEN APPLIES TO AVERAGE CONDITIONS IN THE NETHERLANDS. AS WE HAVE NO INFLUENCE ON THE QUALITY OF SEED POTATOES, WEATHER, BUILDINGS, MACHINERY AND THE EXPERTISE OF THE USER, WE CANNOT ACCEPT ANY LIABILITY FOR THE RESULTS.

Stacking 3-high in shed

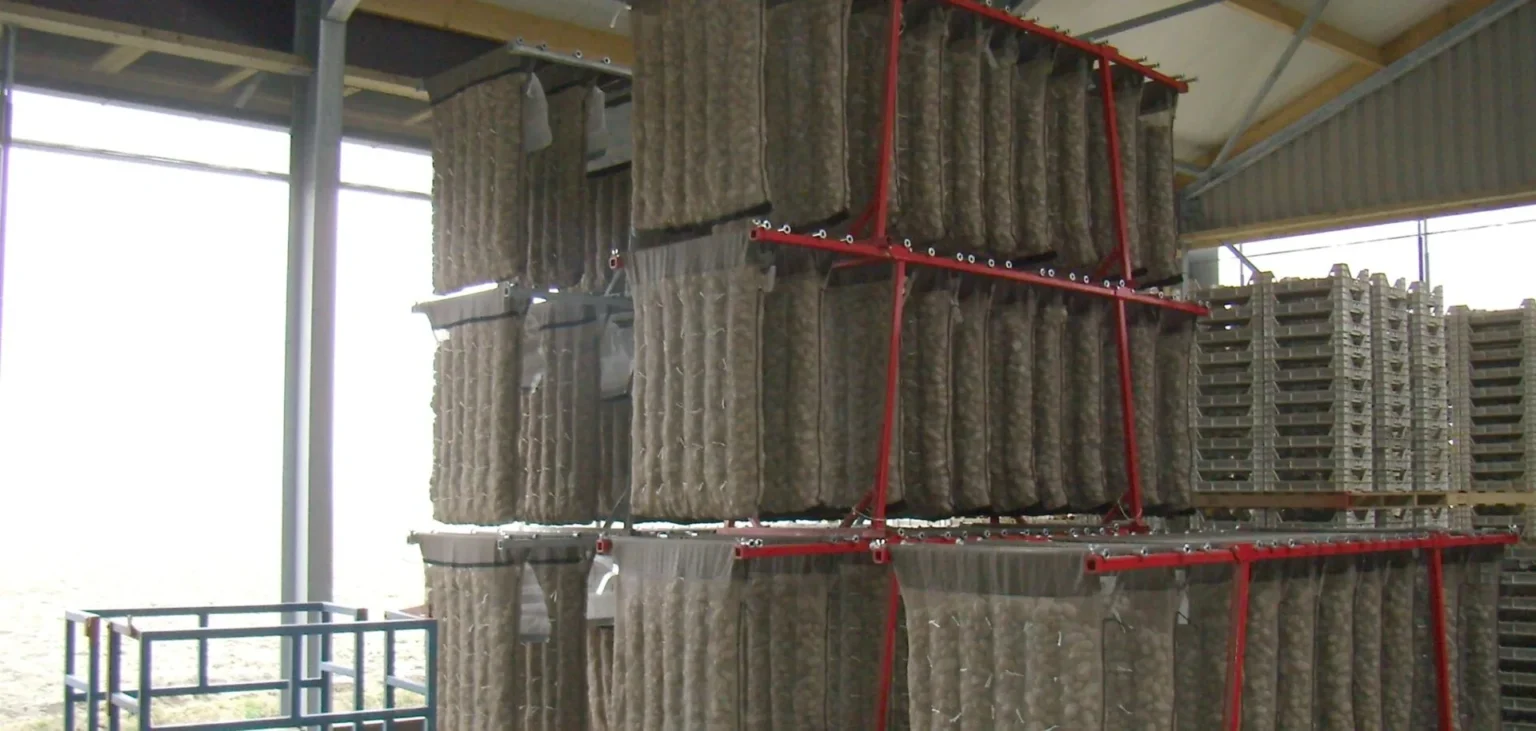
Three Sprinter2 Pre-sprouting racks are 4.5 m high.
This is a stack of 4,200 kg.

Unloading in the planter

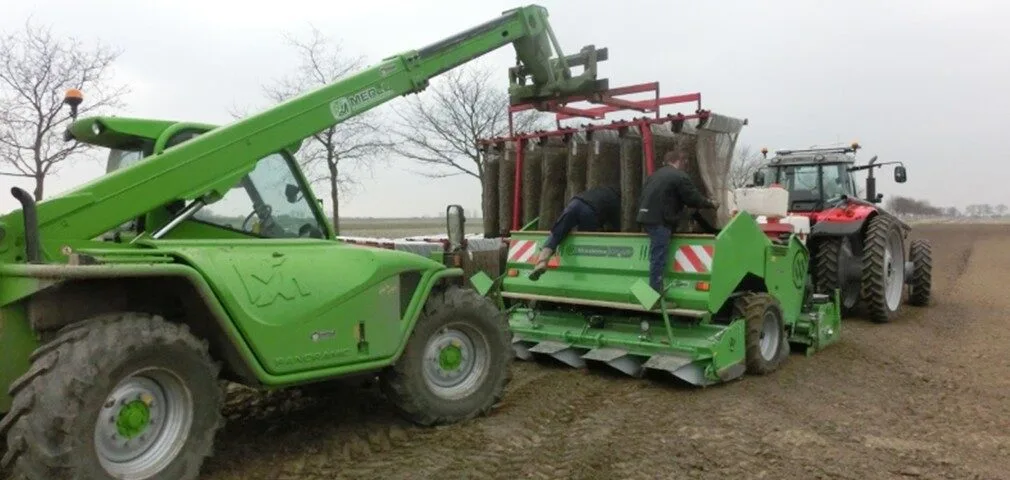
The planter can be filled quickly.
Unfasten the Velcro.
The drop height is low.

Interesting articles

Here you can read articles from the trade press. Colleagues talk candidly about their experiences. Take advantage of this opportunity!

AHDB Chitting review 2021

Agriculture and Horticulture Developement Board

Need advice or want to place an order?

Curious about what
Cor Joppe
can do for you?